If the "Save capture to History" option is selected (default is off), each capture is stored on the Hard Drive as a history buffer and maintained according to the settings configured in Acquisition Options. Each project maintains its own history buffer in a sub folder using the same name as the project file. However, the project file does not require the history buffer to be present when opened. This allows the project file to operate as a 'stand-alone' file for sharing or archival purposes. When saving the project file, the currently loaded capture is embedded in the project (see also: Acquisition Options).
History Browsing
The history buffer can be accessed utilizing the History Menu, the Browse button or the bar graph. These items are located at the bottom of the main window. When browsing the history, the data for that history item will be loaded and all Signals, Auto Searches, Lists, Tables, etc. will refresh as if the data had just been captured.
|
|
Menu Button
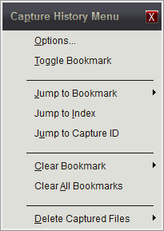
Click the Menu button (highlighted below) to display the Capture History Menu:


Clicking "Options" will take you to the History options in Acquisition Options.
Browse Button

A Left-Click or Right-Click on the browse button (highlighted above) will load the previous or next item in the history buffer. Holding the mouse down will repeat the action in the same direction, causing an "Animation" of the history.
Search History Button

Click this button (highlighted above) to open the Capture History Search. This allows a search of the entire capture history using any normal search displayed in the Global search or the Search Manager.
Bookmark Button

Click the Bookmark button (highlighted above) to toggle a bookmark for the current capture. If already bookmarked, then the bookmark is cleared.
Bar Graph

Bar Graph Display Items:
▪The triangle in the bar graph indicates the current position in the buffer.
▪The small squares represent a bookmarked item which are also listed in the history's menu for quick access.
▪The numbers in the top-left portion of the bar graph represent the Capture ID Number, the Position of the current capture in the buffer and the Total number of captures stored (in that order).
Bar Graph Functions:
▪Click on the bar graph to "jump" to different items in the history.
▪Click and drag the mouse in the bar graph to display the history item number to be loaded when the mouse is released.
▪Click on the "Delete This Capture" button to delete the currently loaded capture. Once deleted, a capture is completely removed from the history and can not be restored.
▪When a capture has not been saved to the Capture History (feature is off or the data is a Preview), the "Delete This Capture" button changes to "Save This Capture". Click on the button to save the capture.
See Also:

